Open topic with navigation
Image Components
Before you can use an image in your layout, you must load the image file into the projects assets folder. There are two ways you can load an image:
- Drag and drop: Drag the image file from your file system to the stage or group where you want to position it. When prompted to upload the image, click OK. Your image is uploaded to the assets folder in the Project panel, and an image component using this image is automatically added to the page.
- File upload: Choose File > File Manager. When the File Manager dialog is displayed, select the assets folder, click Upload, and browse to the file on your computer. After the image is added to the assets folder, right-click the stage or group where you want to add the image, choose Insert > Component > Image, and set the image component's URL property to refer to the image in the assets folder.
To insert an image into a layout:
- Select the stage or the group where you want to add the image and choose Insert > Component > Image.
- Set the URL property of the image to the path of the image you want to display. To use an image from the project's assets folder, drag the image from the folder to the URL property. To use an image from the Web, specify its full URL.
To insert an animated image into a layout, you create an image that contains a list of frames to be displayed to animate the image, as follows:
- Select the stage or the group where you want to add the image and choose Insert > Component > Image.
- With the image component selected, set its Frame Animator property to TRUE.
- For the Frames property, click Add until the number of frame fields is the same as the number of frames in your animation.
- For each frame, specify the image to be displayed. To delete a frame, hover over the field until a minus sign appears, then click the minus sign.
If you want the first frame in the animation to display when the image is not animating, use the same path for URL and the first frame.
To run the image automatically when the page loads, set Active to TRUE.
By default, the animation rins once. To cause the animation to automatically repeat, set Loop to TRUE.
To cause the animation to run depending on the state of particular data or a property, bind a Boolean property or data metric to Active.
To trigger an event when the animation finishes, bind On Complete to the trigger.
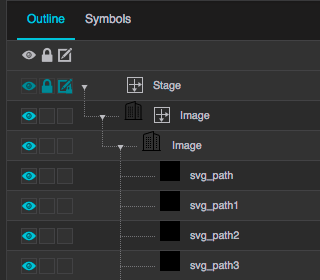
Solution Builder can decompose SVG (scalable vector graphics) images into their component vectors, which you can then edit. To decompose an SVG image:
- Select the image component that contains the SVG file.
- In the Property Inspector, under SVG, find Break Apart and click the Invoke button. The image is decomposed into vectors.
- To view and edit the individual vectors, use the Outline to display the children of the image component, as shown in the following screen shot. You might need to browse several layers deep to access all the child vectors of the SVG image.